Tuesday, December 29, 2015

NodeJS and Promises with MySQL Connector - beware of the unreleased connection

In my NodeJS application I am using the nice MySQL library node-MySQL. I have heavily used Q promises for managing the asynchronous nature of code vs. using callbacks. By using a connection pool, I can reuse connections without having to worry about re-negotiating with the database with every query. My general design is to get a connection from the pool, do whatever I need to do with it and release it. I do not share a connection to another class/service except in the case of "in-transaction" pre/post operations. For example, on update() I have a "postUpdateAdditions()" function that takes the connection as an argument. The rule is it can not release/manage the connection as it is within a transaction.

I was recently getting some strange behavior running my integration tests whereby I was getting out-of-connection pool errors. These appear as timeouts in the system/deadlocks. After spending hours hunting down the problem I discovered two places where I was not properly releasing the connection (and thus I was connection leaking). In general this is not easy to detect (and I even added some logic to my connection manager class to track new and released connections (and to try and flag if they get out of wack)

I came across a strange situation with promises that I didn't think would happen, but it must be a timing related issue.

I had some code like the following:

var defer = q.defer();
connection.query(query_string, function (err, rows) {
    if( err ) {
       defer.reject(err); // rejection will rollback and release in caller
    }
    // do another operation on connection and return to caller
    defer.resolve(somedata);
});

return defer.promise;


Saturday, December 19, 2015

Recently I had to reinstall my operating system and chose Windows 10. I had an issue with my NodeJS 3.x environment and switched to NodeJS 5.x. In doing so, I had issues with the node-gyp again.

It is not clear the order in which I installed everything or if the order matters, but I had to install both the "Visual Studio 2015 Community Edition" as well as the "Visual Studio C++ Build Tools". This was able to solve the various compilation issues I was having.

Saturday, October 3, 2015

Installing libraries with node-gyp and NodeJS 4.1+ on Windows 8+

I have noticed that some node modules come down and compile on Windows. These may be because they detect a compiler environment or because as part of their install they need to be compiled with native libraries. Either way, inevitably you may run into node-gyp trying to compile. Assuming you have the correct tool chain (see the [node-gyp github site](https://github.com/nodejs/node-gyp)) you may still get an error during compile that looks like this:

C:\Program Files (x86)\MSBuild\Microsoft.Cpp\v4.0\V120\Microsoft.Cpp.Platform.targets(64,5): error MSB8020: The build tools for Visual Studio 2012 (Platform To
olset = 'v110') cannot be found. To build using the v110 build tools, please install Visual Studio 2012 build tools. Alternatively, you may upgrade to the cur
rent Visual Studio tools by selecting the Project menu or right-click the solution, and then selecting "Upgrade Solution...". [D:\aurelia-binding-issue-178\nod
e_modules\browser-sync\node_modules\socket.io\node_modules\engine.io\node_modules\ws\node_modules\utf-8-validate\build\validation.vcxproj]
gyp ERR! build error
gyp ERR! stack Error: `C:\Program Files (x86)\MSBuild\12.0\bin\msbuild.exe` failed with exit code: 1
gyp ERR! stack at ChildProcess.onExit (D:\Java\nodejs\node_modules\npm\node_modules\node-gyp\lib\build.js:270:23)
gyp ERR! stack at emitTwo (events.js:87:13)
gyp ERR! stack at ChildProcess.emit (events.js:172:7)
gyp ERR! stack at Process.ChildProcess._handle.onexit (internal/child_process.js:200:12)
gyp ERR! System Windows_NT 6.3.9600
gyp ERR! command "D:\\java\\nodejs\\node.exe" "D:\\Java\\nodejs\\node_modules\\npm\\node_modules\\node-gyp\\bin\\node-gyp.js" "rebuild"
gyp ERR! cwd D:\aurelia-binding-issue-178\node_modules\browser-sync\node_modules\socket.io\node_modules\engine.io\node_modules\ws\node_modules\utf-8-validate
gyp ERR! node -v v4.1.1
gyp ERR! node-gyp -v v3.0.3
gyp ERR! not ok

This is indicating simply that it can not find the 2012 build tools. However installing these tools will not help. Why? Because Node 4.1.1 is compiled to 2013 spec. Therefore you need to pass the following flag to npm install such that it knows to use the 2013 version.... --msvs_version=2013

This will now result in you having to always run install with the following syntax npm install --msvs_version=2013

Update

Monday, October 20, 2014

Webstorm supports Open Source projects

Since all of my open source projects are turning to HTML-5/JS based architectures, I started looking into platforms to develop stamp-webservices 4.0 that would be on the NodeJS platform. I am also supporting ng-scrolling-table which is AngularJS based. I had previously used Netbeans 8.0.X for developing ng-scrolling-table, however the lack of NodeJS debugging and support for many of the NodeJS capabilities was forcing me to look elsewhere. I tried Eclipse again, but like usual with Eclipse, it either works great or not at all. For me it was the later. I had been using MS Visual Studio 2013 however I found this platform rather "annoying" (to say the least - lots of odd key sequences, scrolling in the files and slower than I'd like for pure JS tools).

This led me to look at Webstorm. I had always avoided it, because it seems like just one more IDE tool, was a commercial product and I wanted to support Netbeans/Eclipse initiatives. But after one evening of using the trial version I was impressed! Not only was I able to do full HTML-5 debugging in it, I was able to launch my NodeJS server, debug content, it recognized when node was running and asked to restart (when switching between run and debug modes) and was able to executer all of my Mocha integration tests from the IDE with full stack trace link through. I was sold. I also noticed that they offer a program to support Open Source projects (both of these are) and provide a free license key to the projects. Superb, and I may not consider discussing with my manager to obtain a license for work related activities. Nice to see a company supporting the open source community (which all these companies use internally)

Wednesday, August 27, 2014

Playing flac files in Windows Media Player (WMP)

If you are like me, you don't have a lot of tools for playing video and music files. You use a few simple tools and keep in simple. In my case I primarily use WMP (Windows Media Player) on Windows 8.X and sometimes VLC Player, (esp. on my Linux systems).

If you try and play .flac files in WMP they will not play because the codec is not available. No worries, as there is a great project I found hosted on xiph.org that provides these files to the Windows environment.

Saturday, October 12, 2013

Writing Selenium Tests in a more DSL like way

I noted in a previous blog post that I was starting to write more tests in a more fluent DSL like manner. I thought I would illustrate this. Here is an example of a test that does the following (assuming you are logged in on the home screen):

  1. From the navigator (think of it as a button bar) click the "Create wantlist" - this will launch a create wantlist editor and return this solvent.
  2. We want to fill in the fields and check for certain conditions (like if the form is valid or not). 
  3. We want to hit "save" button
I do not show the additional steps of verifying the item that got created in the table.

public void create() {
    Navigation nav = new Navigation(config);
    WantlistEditor editor = nav.create(Navigation.CreateAction.WANTLIST);
    String id = generateUnique("");
    editor.invalid()
            .set(factory.get(StampAttribute.Country, Country.BASUTOLAND))
            .set(factory.get(StampAttribute.Denomination, "2d"))
            .set(factory.get(StampAttribute.Description, "scarlet (\"Tail\" flaw)"))
            .set(factory.get(StampAttribute.Catalogue, Catalogue.STANLEY_GIBBONS))
            .set(factory.get(StampAttribute.CatalogueCondition, Condition.MINT_NG))
            .set(factory.get(StampAttribute.CatalogueNumber, "193a-" + id))
            .set(factory.get(StampAttribute.CatalogueValue, 2.25))
            .valid()
            .save()
            .success();


On thing to point out is that when I call a method like valid() or invalid() I am not returning a boolean from the function (in the past it would have been a isValid() type syntax. Instead, I am coding the test as I expect it to behave and if it is not behaving in this manner it will fail at that point. As well a method like success() is programmed to look for the closure of the editor as marking a successful create.

As mentioned earlier, I am using an attribute factory to get the attribute. An attribute is a nifty class I created which is able to hold a value that was set (so I can verify it) and also state what the input type is (selection, checkbox, text etc.) and is able to return a selenium By object that I can use for selection.

On large disadvantage of using the chaining approach is exceptions. Unless your methods themselves do not report errors well, it is difficult to trace what line causes the error. This is one disadvantage of DSL interfaces and means you need to think better about the erroneous conditions and how best to log/print them to console/log files.

Selecting ChosenJS values with Selenium

I had previously blogged about selection of GXT selections with selenium and figured it might be worthwhile if I posted what I was doing with my new AngularJS app that is using ChosenJS as my selection of choice (I wrapped this in a simple directive)

For my selenium tests, I try and write most of the code in DSL format in a object termed a Solvent.  We use this term at my place of employment and I think it is a good term and have continued to use it.  This allows me to encapsulate the underlying implementation while presenting a functional level to the selenium tests.  For form controls, I use a generic Attribute class that along with an AttributeHandler knows how to process any attribute type (for example, checkboxes, textfields, textareas, selections, date pickets etc.).  Thus we come to the "code" of how I handle ChosenJS Selections.

First off, lets look at what the generated HTML looks like for the AngularJS control (this represents a drop-down for my stamp conditions):


<select class="condition-selector ng-pristine ng-valid ng-valid-required" name="condition" data-jq-chosen data-options="conditions" data-placeholder="Select a condition" data-ng-model="model.activeCatalogueNumber.condition" data-ng-required="true" data-ng-change="validate()" tabindex="-1" required="required" style="display: none;">
 <option value="? string:0 ?"></option>
 <!-- ngRepeat: cond in conditions -->
 <option data-ng-repeat="cond in conditions" value="0" class="ng-scope ng-binding">Mint</option>
 <option data-ng-repeat="cond in conditions" value="1" class="ng-scope ng-binding">Mint (NH)</option>
 <option data-ng-repeat="cond in conditions" value="2" class="ng-scope ng-binding">Used</option>
 <option data-ng-repeat="cond in conditions" value="3" class="ng-scope ng-binding">Cancel to Order</option>
 <option data-ng-repeat="cond in conditions" value="4" class="ng-scope ng-binding">Mint No Gum</option>
</select>


Mostly this is Angular, although you may notice the data-jq-chosen and data-options variables which are instructions/directives for my directive (one indicates it should turn this drop-down into a ChosenJS control and the other that it should watch/bind to the conditions variable on the controller). If you are not using AngularJS this probably doesn't mean to much to you.
If ChosenJS was not present we could simply operate on this HTML and use an element selector like By.ByName("condition-selector") and click it and choose the appropriate <option> tag matching the value desired. But when ChosenJS is present, it will add additional HTML into the DOM. Specifically for the above example we have this:

<div class="chosen-container chosen-container-single chosen-container-single-nosearch" style="width: 121px;" title="">
 <a class="chosen-single chosen-single-with-deselect" tabindex="-1"><span>Mint</span><abbr class="search-choice-close"></abbr></a>
 <div class="chosen-drop">
  <div class="chosen-search"><input type="text" autocomplete="off" readonly="" tabindex="21"></div>
  <ul class="chosen-results">
   <li class="active-result result-selected ng-scope ng-binding" data-option-array-index="1" style="">Mint</li>
   <li class="active-result ng-scope ng-binding" data-option-array-index="2" style="">Mint (NH)</li>
   <li class="active-result ng-scope ng-binding" data-option-array-index="3" style="">Used</li>
   <li class="active-result ng-scope ng-binding" data-option-array-index="4" style="">Cancel to Order</li>
   <li class="active-result ng-scope ng-binding" data-option-array-index="5" style="">Mint No Gum</li>
  </ul>
 </div>
</div>


And it is this fragment that we need to interact with (since the chosen-container floats on top of the select DOM element). This ChosenJS DOM will always appear as a peer to the select DOM elements. I order to get this to work in Selenium we need to:

  1. Click the chosen-container to invoke the drop-down (this is unpopulated until shown for performance reasons)
  2. Click the appropriate li element.
How I do this, is with some code in my AttributeHandler and when I do a swtich statement on the control type, the logic I have for the select control (which in my case are all ChosenJS) looks like the following:

case Select:
  elm = parent.findElement(attr.asBy());
 String chosen = "../div[contains(@class,'chosen-container')]";
 elm.findElement(SolventHelper.ngWait(By.xpath(chosen + "/a"))).click();
 elm.findElement(SolventHelper.ngWait(By.xpath(chosen + "/div[contains(@class,'chosen-drop')]/ul/li[.=\"" + attr.getValue() + "\"]"))).click();
 assertEquals(attr.getValue(), elm.findElement(SolventHelper.ngWait(By.xpath(chosen + "/a"))).getText());
 break;


In the code fragment above, the parent is passed to the AttributeHandler as a WebElement. This is the container where that form element is located. It could be a fieldset, a panel div or a popup window etc. It is just a starting point so I can find the appropriate element in close proximity. The ngWait( ) method comes from the Protractor project (obviously it is a Java version of this) and simply waits for Angular to complete its digest (The fluent angular project uses this and you can see the source here.)

You may also notice I do an assertion check just to ensure that the value got set on the link. I may ultimately remove this.

But wait, I see you are using xpaths.... that is so last year.... You are right. CSS Selectors is definitely a better way to go. Except.... there is no CSS selector for parent. Often I have found I am starting to use a more mix of CSS Selectors and XPaths. I suppose I could have gotten a Web Element for the "chosen" variable and then simply used CSS selectors from that. Overall, what is nice about this, is I have yet to run into a problem with timing issues like I had with GXT and EXT-JS selectors. Also, the li tags for the values will be ALL the values in a scrollable window, so selenium will select the right value even if it is not on the screen.

I have been a little slow putting together a regression suite in Selenium for my redesigned Stamp Web application written in AngularJS, but I want to upgrade to 1.2.0 and in order to do so wanted to have about 15-20 critical test cases covered first. So far my experiences has been very positive and the number of timing issues is almost negligible (the only issue I have had is when I launch the application I maximize it and sometimes the app will start the login before maximized which causes some issues). Other than that, I have yet to have to use a single "pause()" method which is really nice.


Thursday, October 3, 2013

Arquillian with Glassfish 4 - early trials

With the release of Glassfish 4 and J2EE version 7, I decided to work at upgrading my stamp web services application to the platform. An important part of my project is my 580 odd tests that include approximately 300 or so Arquillian tests. Since my application takes advantage of Container Managed transaction context and persistence providers, it is not sufficient for me to simply tests these in a out-of-container context. Afterall, how can I verify that listeners or cascading relationships cleanup correctly on a delete operation preventing orphans?

Problem with Latest Arquillian


In making the shift to Glassfish 4, I also upgraded the version of Arquillian and ShrinkWrap I was using and ran into essentially classpath hell. I figured my adventures were sufficient that I would blog about it.

First off, once I had it all working, I ran into a bug under Arquillian 1.1.1.Final. The exception was

WELD-001456 Argument resolvedBean must not be null

It turns out, there is an existing bug for this: . In order to workaround this bug, I needed to use Arquillian 1.0.3.Final.  Hopefully this will get fixed soon and I can move up.

Updates to pom.xml


So moving to what I changed (that is why you came here right?) lets start with the pom.xml. 

  1. Since J2EE 7 uses a pretty recent version of Jersey for JAX-RS compliance, I modified my included Jersey dependencies from compile to provided. (The exception was jersey-client used in my tests that I might not need anymore with the latest JSR specs). I tied the version to the version in Glassfish 4 for compatibility (1.17)
  2. I didn't think I would need eclipselink when testing with the embedded glassfish, but this turned out to be needed.  So for this I used the 2.5.0 version matching Glassfish 4.  As well, since I do not have a compile time dependency I changed the scope from provided to runtime.

          <dependency>
                <groupId>org.eclipse.persistence</groupId>
                <artifactId>eclipselink</artifactId>
                <version>${eclipselink.version}</version>
                <exclusions>
                    <exclusion>
                       <artifactId>commonj.sdo</artifactId>
                        <groupId>commonj.sdo</groupId>
                    </exclusion>
                </exclusions>
                <scope>runtime</scope>
            </dependency>

  3. I was previously including the dependency org.eclipse.persistence.moxy to support MOXy in my application, but since this is the default provider now for Glassfish 4 JAXB processing (for JSON) I was able to remove it.
  4. For the glassfish-embedded-all artifact, I switched to use 4.0.
  5. Finally, in the surefire-plugin configuration, I had some classpath dependency exclusions. I had to add CDI to this or else Arquillian was bombing out (one of the JARs was bringing in a incompatible version of cdi-api). I found this using the netbeans maven plugin and the graphical display and this really helps. For reference here is the exclusions:
    
    <classpathDependencyExcludes>
      <classpathDependencyExcludes>javax.servlet:servlet-api</classpathDependencyExcludes>
      <classpathDependencyExcludes>org.apache.felix:javax.servlet</classpathDependencyExcludes>
      <classpathDependencyExcludes>javax:javaee-web-api</classpathDependencyExcludes>
      <classpathDependencyExcludes>javax.enterprise:cdi-api</classpathDependencyExcludes>
      <classpathDependencyExcludes>org.jboss.spec:jboss-javaee-web-6.0</classpathDependencyExcludes>
    </classpathDependencyExcludes>
    
  6. Updated the version of ShrinkWrap to 2.0.0


I would provide the full pom.xml, but it is quite large (currently 508 lines) so I only included these snippets (also pygments.org is not up so I can not get nicely formatted code) .

Summary


Overall, this was a little more painful than I expected - although most of the pain came in the changes to ShrinkWrap and Arquillian versions that I thought I needed for GF4.   What compounded this was the sneaky inappropriate version of CDI that was causing all the dependency injection to fail.


Friday, November 9, 2012

J2EE Application with MOXy

As part of my refactoring of my existing J2EE application using JAX-RS, I wanted to try and reduce the JAXB custom code in place. Previously I was using Jackson and Jersey for JSON serialization using the "Mapped" notation. This involved creating my own JAXBContext object and I was required to create some special mapping processing so that I could map an attribute as etiher an array, non-string or other value.

Since I was going to use the latest version of eclipselink with the refactoring (currently EclipseLink 2.4.1) I decided to check out using MOXy which I had always had my eye on. My goal was to avoid the mapping approach (which was inherently buggy since it required me to remember to add any field to a property file for proper serialization and I could not serialize the same named field differently for different types - ie. field X was always to be type Y). MOXy seemed to like it might be able to address these concerns.

To leverage MOXy in your environment, you need to include it as a provider. In my case I included it in my JAX-RS Application class and set some configuration properties on it. Here is an example of my current application (note I am using Package scanning for JAX-RS resources/providers in Jersey)


public class WebApplication extends PackagesResourceConfig {

 @SuppressWarnings("unused")
 private static final Logger logger = Logger.getLogger(WebApplication.class.getName());

 public WebApplication() {
  super("org.javad.web.providers","org.javad.preferences.model.resources","org.javad.stamp.model.resources");
 }

 @Override
 public Set<Object> getSingletons() {
  MOXyJsonProvider moxyJsonProvider = new MOXyJsonProvider();

  moxyJsonProvider.setAttributePrefix("");
  moxyJsonProvider.setFormattedOutput(true);
  moxyJsonProvider.setIncludeRoot(false);
  moxyJsonProvider.setMarshalEmptyCollections(true);
  moxyJsonProvider.setValueWrapper("$");

  Set<Object> set = new HashSet<Object>();
  set.add(moxyJsonProvider);
  return set;
 }
}

You can read more on the MOXy settings here.

You then need to reference your Application in your web.xml as part of your JAX-RS resource mapping:
<init-param>
    <param-name>javax.ws.rs.Application</param-name>
    <param-value>org.javad.web.WebApplication</param-value>
</init-param>
There are other ways to configure the MOXy configuration, but this is the one that I choose and seemed to fit well for my environment (since I was using a PackageResourceConfig from Jersey for finding my resources).

Since several of my JPA entities included a foreign reference to another JPA entity, I wanted only the ID of the foreign entity to be serialized. Previously I had been using the @XmlIDRef to drive this for serialization, but I had difficulty using this with MOXy. Instead, I needed to declare an XML Adapter to do the serialization and deserialization of the field. This is done using the @XmlJavaTypeAdapter annotation. For my album entity, the foreign key reference to the stamp collection entity looks like this:
@XmlJavaTypeAdapter(StampCollectionRefAdapter.class)
@XmlElement(name = StampFormConstants.STAMP_COLLECTION_REF )
@ManyToOne(optional=false,fetch=FetchType.EAGER)
@JoinColumn(name="COLLECTION_ID",nullable=false)
private StampCollection collection;
In the StampCollectionRefAdapter I transfer the StampCollection entity to an ID and vice versa (when deserializing from a JSON posting). One issue I ran into was that I could not inject the StampCollectionService into this class. This is because these classes are initialized by MOXy (it would appear) prior to the CDI and EntityManagerFactory initialization, so I needed to obtain the EntityManagerFactory which was used in my initialization servlet listener (this sets up a few configurations in my environment). I had tried declaring this class as a @Stateless EJB but did not have any luck (likely because it was constructed explicitly). I may look into this further later, but for now the only way I could get access to the service to transfer the ID back to the physical entity was to leveage the entity manager factory from the initialization listener through a static context (note: this would might fail if I tried to perform any transactions in against this, but should work for normal queries)
public class StampCollectionRefAdapter extends XmlAdapter<StampCollectionRefAdapter.StampCollectionRefType, StampCollection> {

 public StampCollectionRefAdapter() {
  super();
 }
 
 @Override
 public StampCollection unmarshal(StampCollectionRefType v) throws Exception {
  StampCollection collection = null;
  EntityManagerFactory emf = SessionInitializer.getEntityManagerFactory();
  if( emf != null ) {
   EntityManager em = emf.createEntityManager();
   if( em != null ) {
    collection = em.find(StampCollection.class, v.id);
   }
  }
  
  return collection;
 }

 @Override
 public StampCollectionRefType marshal(StampCollection v) throws Exception {
  StampCollectionRefType t = new StampCollectionRefType();
  t.id = v.getId().longValue();
  return t;
 }

 public static class StampCollectionRefType {
  @XmlValue
  public long id;
 }
}

I am having a small issue with arrays of Entities. I have a serializable class which is Genericized and has two fields:
  • total - representing the total number of objects (not necessarily the items returned)
  • items - the List of entities to be returned
The first oddity was I could not define a getItems() method on the abstract class. Instead I had to declare it on the concrete class that implements the Generic type. The reason for this is I want my array of items to be the plural of the actual items contained within it. This requires me to declare the collection similiar to the following:
@XmlRootElement(name="list")
@XmlAccessorType(XmlAccessType.PROPERTY)
public class AlbumModelList extends AbstractModelList<Album> {
 @Override
 @XmlElement(name="albums")
 public List<Album> getItems() {
  return items;
 }
}
The resulting JSON will thus look as I intended:
{
    "total": 5,
    "albums": [
        {
            "id": "2000",
            "name": "Test Collection X",
            "countryRefs": [],
            "stampCollectionRef": 1
        },
        {
            "id": "1",
            "name": "Test Collection x2",
            "countryRefs": [],
            "stampCollectionRef": 1
        },
        {
            "id": "2",
            "name": "Test Collection x4",
            "countryRefs": [],
            "stampCollectionRef": 1
        },
        {
            "id": "3",
            "name": "Test Collection x5",
            "countryRefs": [],
            "stampCollectionRef": 1
        },
        {
            "id": "4",
            "name": "Test Collection x6",
            "countryRefs": [],
            "stampCollectionRef": 1
        }
    ]
}
But if I use a content type of XML (which I am not using very often) the Array is not showing up as am <albums/> element that contains <album/> nodes but instead looks like the following:
<?xml version="1.0" encoding="UTF-8" standalone="yes"?>
<list>
    <total>5</total>
    <albums id="2000">
        <name>Test Collection X</name>
        <stampCollectionRef>1</stampCollectionRef>
    </albums>
    <albums id="1">
        <name>Test Collection x2</name>
        <stampCollectionRef>1</stampCollectionRef>
    </albums>
    <albums id="2">
        <name>Test Collection x4</name>
        <stampCollectionRef>1</stampCollectionRef>
    </albums>
    <albums id="3">
        <name>Test Collection x5</name>
        <stampCollectionRef>1</stampCollectionRef>
    </albums>
    <albums id="4">
        <name>Test Collection x6</name>
        <stampCollectionRef>1</stampCollectionRef>
    </albums>
</list>


Not sure what I am missing here, but I need to address this at some point along with modifying my entity IDs from wrapper types to primitives.


EclipseLink logging with Arquillian in Eclipse

I have been doing some experimentation with Arquillian for testing my refactored J2EE application in embedded glassfish. I really like it so far, but I ran into an issue where me test-persistence.xml file use did not see to provide anything more than SERVERE level logging from eclipselink. I had tried setting the property
<property name="eclipselink.logging.logger" value="DefaultLogger"/>

to no avail. I also set this value to JavaLogger without results. I finally stumbled across an answer while looking into changing the embedded glassfish http port - and that is to use the following value:

<property name="eclipselink.logging.logger" value="org.eclipse.persistence.logging.DefaultSessionLog"/>

This allows me to see the SQL statements (assuming your set the other log values) in both Eclipse and through the maven command line test execution.

Thursday, November 1, 2012

Diving into J2EE6 with JTA

I have been silent for a long time on the blog (I have been busy - never fear) but simply have not spent the time here to document my activities.

I was in the process of doing a major overhaul on my server-side JAX-RS WEB Services and their accompanying persistence services to bring things up to a little more standard approach. In particular my goals were to:

  1. Utilize more dependency injection (from JSR-299) to avoid having to separately manage my services in a factory.
  2. Utilize JPA using the JTA transactions and a JDBC datasource (I was previously using Resource_Local transaction modes
  3. Inject the EntityManager (or factory - see below)
  4. Leverage in-container testing using Arquillian for the services (to verify the transactional integrity of the services)
  5. Clear out remnants and methods from when the services were used by a Swing Application (which was replaced by Stamp Web 1.0 in 2008)
  6. Leverage MOXy with JAXB for JSON serialization from JAX-RS WEB Services in place o the Jersey implementation with Jackson and mapped notation (which had required me to create custom JABXContext objects, register properties in my custom mapping file etc.)
  7. Provide a proper JAX-RS implementation using Response Builders. Previously I was returning a JSON object with a success flag instead of using valid HTTP Status objects like NOT_FOUND (404)
  8. Provide complete testing of all JAX-RS WEB Service methods in particular using both JSON and XML supported content encodings and verifying all response code for non-conditions.

As you can imagine this has turned out not to be a small effort and I have had to learn and re-learn a lot of areas of J2EE I had convienently left behind in my memory space.

The following is probably the most important points to remember when designing an application like this:

  1. Start small. I didn't simply start modifying my codebase. Instead I started a new project and brought over the highest level concepts (in my case my PersistableObject, AbstractPersistenceService and a few other classes) and built it up from there - testing as I went. This allowed me to verify the new JTA based approach and also let me figure out a few concerns. For example, previously I had to manage all commit/rollback code. Initially I was thinking to mark methods as Transactional and write an interceptor (which led me down a deep hole of Interceptors) only to realize this was not needed in a JTA context.
  2. Early on I read a blog article that stated that you shouldn't use @PersistenceContext (injecting an EntityManager) because it wasn't thread safe and should instead use @PersistenceUnit (injecting an EntityManagerFactory). This seemed like a good idea and worked... until I tried to save 150 stamps (which each created a EntityManager at a lower level of the code). It appears when using JTA and Container Managed transactions (CMT) creating an EntityManager from the factory will establish a different connection in the pool (I couldn't verify this other than I was seeing max-connection errors and deadlocks in my arquillian tests - but only when this test was used). After some reading, I saw that using @PersistenceContext in CMT it becomes the responsibility of the container to close and manage the EntityManagers. Doing so (in place of using the factory to get a new one) instantly rid me of the connection errors and I see a balance of connection threads - Note the test that hit this is one that never happens in my WEB application (yet) but I am glad to have hit this now - rather than after deploying on my production server.
  3. Arquillian took a little effort to get completely working right, but now that I have it working it seems to work nicely for testing my services "in context". I am currently testing my WEB Services using the jersey-client module and running them after my application is deployed to glassfish. I do want to do some further experimentation to see if I can use Arquillian for these (this article looks promising: http://www.samaxes.com/2012/05/javaee-testing-introduction-arquillian-shrinkwrap/)

Along with my services, I am actually going to rewrite my client side application from a GWT/GXT 2 based solution to SmartClient JS. I originally was going to convert to GXT 3, but I have become pretty disillusioned with the roadmap from Sencha, and therefore are planning to go with a JS based client application. In order to pace this, I need to keep the existing GXT 2 + WEB Services running (which is why I am creating a new Web application project) and will be converting/creating client portions on a priority basis. As well, from the services perspective I am attempting to capture a new level of test code coverage (before it was about 45% now I am aiming for 70%+). To accomplish this, I am not writign any WEB Services beyond my first one to ferret out the testing/WADL approaches to prevent me from working on the client code until the server is complete and solid.

Thursday, July 15, 2010

Firefox, Selenium GXT and the nasty Quick Find Links Only

So I have seen this intermittent error with my selenium tests that drives me up the wall. I'll be running a test and all of a sudden a little "Quick Find" box shows up in the lower left corner in Firefox (not the same as CTRL-F). This appears to be some sort of "old feature" of firefox that is used to quickly find links or something in the page (people have complained about it since Firefox 1.0). If you google the term "firefox quick find links only" you'll see the issue. Basically if you are in a non-input field (like the page) and type either "/" or "'" it will invoke this. The problem is, in GXT with selenium in order for some values to be input, events need to be raised by my selenium tests to blur/focus etc. Even though I am not typing in an apostrophe or slash, some sequence will trigger this control. Usually it was during the typing in a text field after clearing it and the first character (or in the case of my tree filter the 8th character?) would be dropped. It turns out, a solution that appears to work is the use of a Firefox plugin to turn off this widget/control (not sure why there is not a setting to do it by default - since I am sure most people do not even know the functionality is there).

There is a solution for this, but in order to use it you'll want to setup Firefox and Selenium to use a custom profile (since you have to install this plugin). To do so, start firefox with the -profileManager argument (ie. firefox -profilemanager). Be sure not to have any instances running when you do this (or else it will be ignored). When the profile manager shows up:
  1. uncheck the "don't ask at startup" - we'll restore this later
  2. choose to create a new profile
  3. give your profile a name like "selenium" and click the choose folder. Before going further write down this path as you will need it along with the profile name. On Windows 7, mine would be c:\users\myusername\AppData\Roaming\Mozilla\FireFox\Profiles.
  4. Launch Firefox using this profile.
  5. Go to your favorite website (like my blog). Without clicking in a textfield, hit the button "/". If you see a Quick Find show up, the next should help disable this.
  6. The process to disable the Quick find is documented here. In particular you'll need to download the plugin and install it to Firefox (on Windows is .xpi is not mapped to firefox choose to pick a file and choose firefox). Once installed, follow the instructions.
  7. After "disabling" it, try step 5 again and this time the Quick Find should not show up.
  8. Now you have a Firefox that will run the selenium tests without Quick Find, but selenium is not using it. The next step is to modify your selenium startup script (if you are running it by typing java -jar selenium-server.jar write a script!. In the script, add the flag -firefoxProfileTemplate path_to_profile_above\profile_name to the end of the command. This will use your custom profile for executing the tests.
  9. Finally, close down firefox and launch it again. This time checkoff the "Don't ask at startup" and choose your regular profile and you are off back using firefox with your profile.

Friday, March 5, 2010

GXT and Selenium - Part 2

First off, to all those who have patiently asked for my solution of GXT combo boxes and selenium, I do apologize for the long time in coming. While reading my articles is certainly not like being left with a cliff hanger in a movie sequel, I know the pain in waiting anxiously for a solution.

Combo Boxes
After trying many different ways to get combo boxes to work, I have worked out a pattern which I will share which has seemed to provide the greatest stability in our tests. We currently have forty-odd selenium tests run upon check-in to trunk for the stamp webeditor project. Approximately half of them utilize one of the dozen or so combo boxes in my application and the only failures we have seen is when there is actually something wrong with our underlying code.

Here is a break-down of the steps:

  1. If a label is provided (ie. a combobox with a label), attempt to wait for the combobox to be enabled. When the combobox is first shown, the backing store may be initializing or other activities may be happening, thus causing the combobox to be disabled. The routine will simply wait a duration for a given number of cycles for the combobox to be enabled.
  2. The combobox will be clicked.
  3. If the combobox results are visible, and one of those results is the item we are looking for, a mouseDown event will be emitted on the resulting item. If not present, a system out message will be printed (I found this useful in debugging the issue. In practice I may only see the message once if the system is bogged down and running slow)
  4. I found a need to wait another duration after the mouseDown event, proceeding with firing off a blur event. While these last may not always be needed, as I mentioned above, I have not had any failures show up due to combobox selection and having these in the code certainly have helped!

I should mention the waitDuration and waitCycles are simply integer static values (125 and 20 respectfully however I can configure these via configuration). Finally the pause() method is simply a Thread.sleep() call wrapped in a try/catch block. One of my readers Carl, suggested using the Selenium.Wait( ) functionality, which I may explore in the future.

So lets look at some code:

 /**
  * Will select the text in a ComboBox by the specified locator.  If the ComboBox is provided
  * a label, the method will try and determine if the ComboBox is disabled, and if it is wait
  * for it to become enabled (or timeout after 5000 seconds whichever is first).
  * 
  * @param selenium The selenium context
  * @param text  The text to pick from the selections
  * @param locator The locator of the selection input box
  * @param label  The label for the ComboBox (optional)
  */
 public static void selectByText(Selenium selenium, String text, String locator, String label) {
  if( label != null) {
   String disabledLocator = "//fieldset//label[.='" + label +":']/following-sibling::div//div[contains(@class,'x-item-disabled')]";
   int timeout = 0;
   while( selenium.isElementPresent(disabledLocator )) {
    pause(waitDuration);
    timeout++;
    if( timeout > waitCycles) {
     throw new SeleniumException("Selection element was not enabled after timeout");
    }
   }
  }
  boolean found = false;
  String downDownLocator = "//div[contains(@class,'x-combo-list')]";
  String itemLocator = downDownLocator + "//div[contains(@class,'x-combo-list-item') and .='" + text + "']";
  selenium.click(locator);
   for(int i = 0; i < waitCycles; i++ ) {
    if( selenium.isElementPresent(itemLocator) && selenium.isVisible(itemLocator)) {
     selenium.mouseDown(itemLocator);
     found = true;
     break;
    } else if ( selenium.isElementPresent(downDownLocator) ) {
     System.out.println("selectByText() - at least div for the combo is present...");
    } else {
     System.out.println("selectByText() - no div for the combo present.");
    }
    pause(waitDuration);
   }
 
  if( !found ) {
   throw new SeleniumException("locator:" + itemLocator + " not found.");
  }
  pause(waitDuration);
  selenium.fireEvent(locator, "blur");
 }
 

Hopefully this can help alleviate some of the pain out there around the GXT combo boxes and selenium.


Version Info
GXT: 2.1.1
Selenium: 1.0.1

Thursday, February 18, 2010

Reviewing ForeUI to prototype screens

Recently I have had the pleasure of working together with one of my coworkers on my Stamp Web Editor project (on our personal time of course). Like all skilled professionals she wanted a chance to try and use some new technologies and libraries (like GXT, JPA and Restful Web Services) and I realized I simply could not continue to develop my hobby application without involving more developers. One problem arose quite quickly. I went from the "one man shop" to having to express my ideas and intentions to another developer often through email and napkin drawings. I also felt there was no permanence to the designs or formal drawings to really refer back to. At my employer I know several of the Product Definition folks use a tool called Balsamiq for doing napkin like designs, which I always felt lacked a sense of fidelity. I wanted more. A quick google search turned up a bunch of different tools.

One that I investigated was a firefox plugin called "Pencil". This is a freeware application, but I found it lacking when trying to show any sort of flow (it is really designed I think to provide a static prototype). Still, if you need a simple tool to show some buttons and forms, this might be a light weight way to achieve this.

The next tool I looked at was called ForeUI from EASynth. While the tool is a commerical product, the EASynth offers a full featured version as a demo which the user can use for 15 days. Some functionality (such as Save and Export) will be unavailable after this time period expires.

Installation/Setup

The install was clean and easy and the application launched on my Windows 7 laptop without any issues. A program group was added in my application bar under "EaSynth" which I would think many users might find confusing (since they installed ForeUI didn't they?) but once you get familiar with it, it should be easy enough to find for most users. It would appear that it is setup by default to look for a newer version of the software which will prompt the user when available:

Capabilities and Impressions...

The first thing that impressed me about ForeUI was its clean user interface. My "paper" page was right in front of me, and the widget I could choose from were easy to find on the left. A toolbar/menu was present for the "actions".

In ForeUI, a plot concept is used to represent your "prototype". You can add multiple pages to your plot and provide actions to transition between pages.

Right away I was able to start adding widgets to my page and exploring deeper. One thing that I did find a little confusing at first was that you had to drag the components onto your page. It was not like Microsoft Powerpoint where you pick your element and click on the page to add it. This is similiar to most GUI-builder tools (like Matisse in Netbeans) and it didn't take me long to pick up the correct action. I was impressed with the components available to the user and they included both application components (group frames, calendars, menu bars) as well as components you might find in a website (images, mock text). The components available allow prototypers to develop a prototype for:

  • Web sites
  • Rich Web Applications / Desktop Applications
  • Layouts (either was Web pages, blog or non-computer related layouts)
As well as visual components, a set of Annotations are available to allow you to annotate your designs with Balloons, Post-Its and Lines. This is especially useful in calling out elements of behavior within your pages. There also appears to be a portal where users can Share their custom components called "Resource Sharing". Some of the examples currently available include a Map component, Ad spots and arrow libraries. While providing a good selection of components, one that I found missing was some sort of accordion panel (the irony is that the components themselves are housed in one). Another confusing aspect was the location of a few of the components. For example the traditional label and images show up under the Basic panel. While these are basic constructs of all prototypes (Web, application, layouts), while working with the widget components I often found myself having to think twice on where I go to get the text label.

Once a component is dropped on the page the user has to ability to customize it further. Overall, I was quite pleased with the options which included:

  • Changing the visibility
  • Setting the state of a component (disabled, selected etc.)
  • Specifying the font type, weight and color
  • Defining the text of the component
  • Z-Ordering of the component
In order to change the properties of an item, you can either right-mouse click on it and choose from the menu options or select it and then the elements toolbox appears (by default on the right side of the screen):

One aspect I found very confusing was "where" a property option would be. Some options were only available from the toolbox (Group, Z-Order etc.) whereas other were available both from the context-menu and toolbox. Using the context menu is the most efficient, but I started finding myself ignoring it after a while because the options I was looking for were not present. The font for the components will be dialog by default. This produced horrible looking "simulated prototypes" and I had to manually change the font on every component after I had added it. I discovered an option afterward in the Settings menu under the Plot tab where you can specify the default font which appeared to take care of this. One aspect of property editing which could be improved is the double-click edit text capability (you select an item in your page and double click it to edit the text). More the half the time, even when clicking quickly, any movement of the mouse would move the component (thus throwing off my alignment). You can edit text from the toolbox (the pencil icon top-left) and I quickly preferred this approach to avoid the movements of my items. Perhaps if it was not as sensitive (or the move was delayed) this would be a cleaner experience.

The user can move the component around the page either with a mouse-drag or by using the arrow keys (once selected). As you drag near other components, spacing guidelines will appear letting you know that you are aligned along the center, top, middle etc. This allows you to quick setup a user-interface and still have it aligned properly. The guidelines only appear after the item is on the page so you do have to get used to the double drop (ie. pick a widget drag it to your page and drop it. Then select and drag it around your page to get the guidelines). There are some quick options to align horizontally/vertically etc. if more than one item is selected. When you move and align an item with guidelines, there is no concept of spring boundaries (like in Matisse) such that if you add a text field to a window and set the textfield to be most of the width of the window, resizing the window will not resize the text field. There is also snap capabilities which is useful, however I found the default snap value (5 pixels) a little tight.

Grouping of items is supported however in order to do so, you need to carefully select the items and select the "Grouping" icon from the element toolkit (I am not sure why this is not available from the right-mouse context menu). If you stack several components on top of each other it can be difficult to select the right ones. You can get at buried items using the CTRL-left or CTRL-right keys.

You can add events on an item using the action capability. This is very powerful in communicating intent. The type of events you can add depends on the component used but include concepts like:

  • changing the visibility (hiding/showing)
  • changing selection (comboboxes, checkbox, tables)
  • changing pages (navigating to a new screen)
I used it for both showing my annotations (on mousing over a component) as well as invoking events on click.

The table component is a very polished read-only component for ForeUI. The data for the table is excepted as a comma delimited list (with the headers being the first row of data). I found the easiest way to create fake data was to use Excel and export the file as csv (and then copy/paste the CSV content from notepad into ForeUI). It would have been nicer if I could have input the data easier within the ForeUI tool, but I am happy with the end result. One thing that was lacking about the table was providing editable cells (as well as defining a component to use for the editor). I worked around this by dropping an editable component in the desired row above the table (Z-order wise). You seem to only be able to register a single "click event" you will not be able to take the user through a edit session easily. Providing the ability to supply actions / table cell does not appear to be supported and this would really allow for some complex client interactions. For this reason I switched to showing the application in a more static manner and instead used annotations to call out capabilities as the user mouses over components.

I was able to create a relatively accurate representation of my desired client in quick order. Since I was only designing a pop-up tool for my application, I decided to represent my application as a static image and then added a custom toolbar action as a launch point for the new client tool. In order to represent the lightbox affect, I had to drag a filled rectangle over the image (and under the popup tool) with an opacity setting. As I added new screens to the plot, I learned that if my page represented a popup tool, that I should focus first on these components and then add an main application image (with the partially transparent rectangle for masking) afterwards and send this to be back with the Z-order action. An example of a page I designed is here:

Several preview options are available include a Slide Show (showing each of your screens statically) and a Simulation tool which will run your pages in your browser (allowing you to click/iteract with the client). The following is a video I produced for one of the new features I want to implement that shows the simulation:

You can export the project to a variety of different formats including PDF, HTML or as images. The PDF and image formats of course do not provide interaction with the action events, however the DHTML option does output the actions you defined so you can interact with the client (likely using Javascript) using the simulation tool.

Technical Observations

  • The ForeUI application is written in Java, which allows some nice customization ability such as applying different Look and Feels:
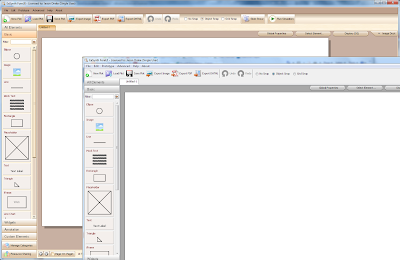
  • The application when running consumes approximately 160 MB of memory (this was for a three page 50 element prototype with a few interactive actions). Overall this is not too bad and is less than the average requirements for an IDE like Eclipse with Java tooling.
  • Overall performance and responsiveness was good, which to me shows me that the developers at EaSynth know how to develop proper Java Swing applications by not performing large computational operations on the Swing Event Thread.
  • I did not run into any crashes, fatal errors or discernable bugs in the hours I have used the tool to date.

Conclusion

With a comprehensive toolkit, the ability to add actions and simulations, as well as online connectivity tools for help, tutorials and additional components I would rate the EaSynth ForeUI 2.X prototyping tool on a scale of ten as a value of

My biggest complaint would have to be the inconsistencies in interacting with the component properties and and look forward to exploring its capabilities deeper as I begin to prototype other areas of my application.


Disclaimer
EaSynth provided me with a complementary license to review their product. I think this is a great way for them to recieve more publication of their tool, however as a professional I would be amiss if I allowed this to interfere with my assessment of the product.

Monday, January 25, 2010

Selenium and GXT CheckboxListView

I recently updated my application to use a menu hooked up to a button in which I display a GXT CheckboxListView of stamp issues. The general idea is that when defining my stamp if there are flaws (I tend to avoid collecting these) I can check-off the flaws in a drop-down like list. I added some selenium tests to capture the correct functionality, and came a across a few interesting points I thought I'd share.
  1. GXT does not appear to let you set a constant on the checkbox, such that can you tie it back to an enumerated list easily. This meant I had to navigate to the text of interest (localized display value of the enum) and then proceed back in the DOM to get the input field such as the following:

    MENU_LOCATOR + //td[.='" + display_str + "']/../td/input[contains(@class,'x-view-item-checkbox')]
  2. For closing the menu, the best approach I found was to use the "Escape" key on the menu itself:

    selenium.keyDown(PICKER_LOCATOR, "\u0027");
    selenium.keyPress(PICKER_LOCATOR, "\u0027");
    selenium.keyUp(PICKER_LOCATOR, "\u0027");
  3. Setting the value of the checkbox turned out to be more than simply using click(). In order for the click to be registered with the underlying GXT models I also needed to emit a DOMActivate event on the checkbox:

    selenium.check(getCheckboxLocator(str));
    selenium.fireEvent(getCheckboxLocator(str),"DOMActivate");

Version Info
GXT: 2.1.0
GWT: 2.0.0

Sunday, January 17, 2010

Unable to deploy JPA to Tomcat (Linux server)

I had to reimage my linux server due to a catastrophic disk failure. In doing so, I had to reinstall tomcat(s) (I use two... one for running my stamp app and the stamp test app (selenium testing) and one for running hudson builds). When my ant script for my stamp application deployed to the "production" tomcat, the start target would fail. I looked in the tomcat logs and saw this:

Exception Description: Predeployment of PersistenceUnit [stamp-test] failed.
Internal Exception: java.lang.RuntimeException: Exception [EclipseLink-7018] (Eclipse Persistence Services - 1.1.2.v20090612-r4475): org.eclipse.persistence.exceptions.ValidationException
Exception Description: File error.
Internal Exception: java.io.FileNotFoundException: /etc/rc.d/init.d/tempToDelete.xml (Permission denied)
at org.eclipse.persistence.exceptions.PersistenceUnitLoadingException.exceptionSearchingForPersistenceResources(PersistenceUnitLoadingException.java:121) 
at org.eclipse.persistence.jpa.PersistenceProvider.createEntityManagerFactory(PersistenceProvider.java:133)
at org.eclipse.persistence.jpa.PersistenceProvider.createEntityManagerFactory(PersistenceProvider.java:67)


This threw my for a loop, until the path where the file was being read/written to tipped me off. I have startup scripts that use the java service daemon (jsvc) which are located in /etc/rc.d/init.d. Sure enough, this was the problem. Essentially eclipselink was trying to create a temporary file while attempting to clone an object when TABLE_PER_CLASS inheritance is being used. The fix turned out to be quite simple. I simply had to perform a change directory prior to calling the jsvc to the $CATALINA_HOME(or wherever your tomcat lives) prior to invoking the jsvc.

Sunday, December 13, 2009

Upgrading to GWT 2.0 with GXT 2.1.0

I had to upgrade my GWT version to 2.0.0 with GXT 2.1.0. For the most part this was pretty straight forward. One change that impacted me was the usage of ImageBundle being deprecated. To convert it to the GWT version of doing things I had to do the following:
  1. extend com.google.gwt.resources.client.ClientBundle instead of ImageBundle
  2. replace @Resource with @Source (from ClientBundle)
  3. the return types will need to change to com.google.gwt.resources.client.ImageResource for each of the image methods.

Instead of using the interface directly (after being runtime binded with GWT.create()), you will need to convert the ImageResource to an AbstractImagePrototype. This can be done by calling the create(ImageResource) method.

The thing that is unfortunate about this, is all my setIcon() calls simply referred to a singleton instance of the images. Now they all need to convert to via the create() call. Hopefully I can work out a nicer solution for the future.

The article that helped guide me in this came from the google wiki: ImageResource

Version Info
GXT: 2.1.0
GWT: 2.1.0

Friday, December 11, 2009

GXT 2.1.0 Conversion

The following is a list of the issues I ran into when I converted from GXT 2.0.1 to GXT 2.1.0. This is not the complete exhaustive list, however these may provide others with some of the workarounds.

  1. My dialogs will cascade events to the form panels and their contents on the dialog. A change was made to Layout which requires all components which are receiving the event to have a layoutData defined. Since dialogs would normally not hold a layoutData (in my case they were using FitLayout which results in a null layoutData), I had to change the cascading to start at the dialog's FormPanel.
  2. All text input components have the wrapper set to the id used to create the component (this should be a <div/> tag). The physical input field now has a "-input" added to the end of the id. This impacted my Selenium tests.
  3. The StoreFilterField required the setProperty("name") to be called in order for the filtering to actually be invoked. I also changed my overloaded applyFilters() method to be similiar to the super method in the way it adds/removes the filter on the store.
  4. @Override
    protected void applyFilters(Store<ModelData> store) {
     if (getRawValue().length() >= 3) {
      store.addFilter(filter);
         store.applyFilters(super.getProperty());
        } else {
         store.removeFilter(filter);
        }
    }
  5. In my country ListView, when the Events.Select was raised I was retrieving the selected countries from the selection model. This either changed or I was doing it incorrectly, as now the selection model was returning the items before the selection is registered. Instead, I switched to use the getIndex() of the ListViewEvent to find the country that was selected.
  6. For my image panel, I was using a GWT HTML component. This now required the parent to implement HasWidgets interface, which the ContentPanel in GXT doesn't (since all GXT components extend Widget from GWT). Fortunately there is a GXT component Html which does pretty much the same as the GWT one, and converting to use this worked.
  7. Nodes in a TreePanel had their rendering changed from a <li> tag to a <div> tag. This impacted Selenium tests.
  8. Popup menus changed from using <li> tags to using <div> tags. This impacted Selenium tests.

Overall, the changes took me approximately 5 hours to incorporate and resolve the differences in my selenium tests. Some of it was due to changes in the rendering of the GXT components (which is to be expected and is not difficult to reconcile) and some of it was related to event sequencing and component model changes. It was these later changes which impacted my time the greatest.


Version Info
GXT: 2.1.0
Selenium: 1.0.1

Saturday, November 7, 2009

Civilization 4 on Windows 7

If you install and attempt to run Civilization 4 on Windows 7 you will likely receive an error similiar to the following:

I was able to resolve this by downloading and installing the latest released runtime version of DirectX. I suppose if you install and play many games you likely have a newer version of the DirectX runtime, but this game was my favorite and was the first (and currently only) DirectX game I am running under Windows 7.

Saturday, June 6, 2009

Pygments for Source Highlighting

I mentioned to a colleague a week ago that I wanted to provide better syntax highlighting of source code in my blog entries. He suggested I look at Pygments which is a "generic syntax highlighter for general use in all kinds of software such as forum systems, wikis or other applications that need to prettify source code.". I have to admit, I kind of like it and it is relatively easy to use (just make sure you use spaces in your code instead of tabs!

Take a look: http://pygments.org.